Selecting the Number of Records to Print:
Use the "Display" box on the Local Toolbar to type or select the number of records to print. The maximum number of stocks that can be displayed while viewing RealTime data is 100.
Printing from the Local Toolbar:
![]()
Access the Stock, Industry, Sector, Market Index, ETF or WatchList Viewer, or UniSearch Results.
Choose the number of records to print by changing the number of records to display.
Click the Printer Icon on the Local Toolbar. The Print Preview Window will appear.
Click the Printer Icon on the Print Preview page.
The page orientation (landscape or portrait) and column layout may be changed using the Toolbar at the top of the Print Preview Window.
Printing from the Options Menu:
Access any Viewer Grid. (Stock, Industry, Sector, Market Index, ETF WatchLists, Unisearch, and Portfolios use Viewer Grids to display information.)
Right-click on any record in the Viewer Grid (any stock, industry, or sector).
Select "Print" from the Options Menu that appears.
Click the Printer Icon on the Print Preview Page.
The page orientation (landscape or portrait) and column layout may be changed using the Toolbar at the top of the Print Preview Window.
Changing the Paper Orientation:
![]()
From the Print Preview Window, left-click "Page Setup..."
Left-click the radio button beside "Portrait" (vertical orientation) or "Landscape" (horizontal orientation).
Click "OK".
Changing the Print Margins:
![]()
From the Print Preview Window, left-click "Page Setup..."
Type the margin to be used for the left, right, top and bottom of page.
Click "OK".
Selecting Columns to Print:
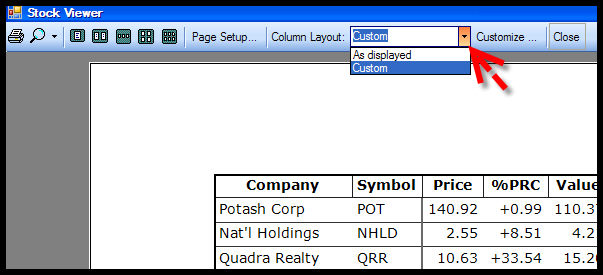
Left-click the drop down arrow next to "Column Layout", and select "Custom" (see picture below). The print preview screen will refresh.
Left-click "Customize..." next to the drop down menu. The Print Layout Window will appear.
To remove a column: Select the column name in the "Columns in Grid Panel", and left-click the arrow pointing to the left. The column will be moved to the 'Field List', and will not be printed.
To change the placement of a column, select the column name in the "Columns in Grid Panel", and use the up/down arrows to move the column to the desired location.
To add a column, select the column name in the "Field List Panel", and left-click the arrow pointing to the right. The column will be moved to the "Columns in Grid Panel", and will be printed.
3. Click "OK" when the changes are complete.
Note: Multiple fields may be selected by tagging.
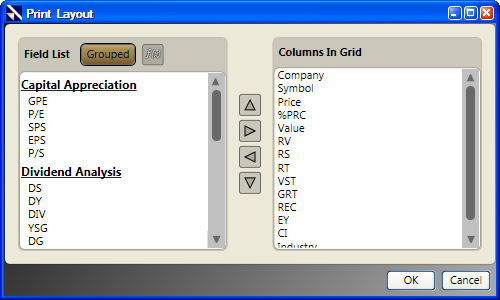
Viewing Fields in the Print Layout Window:
By default, the fields shown in the Print Layout Window will be grouped by category. Click the "Grouped" Button to display the fields without their groups.
Creating Custom Fields from the Print Layout Window:
Custom Fields may be created and added directly from the Print Layout Window. To create a custom field click the "F(x)" Button. For more information about building custom fields, click here.